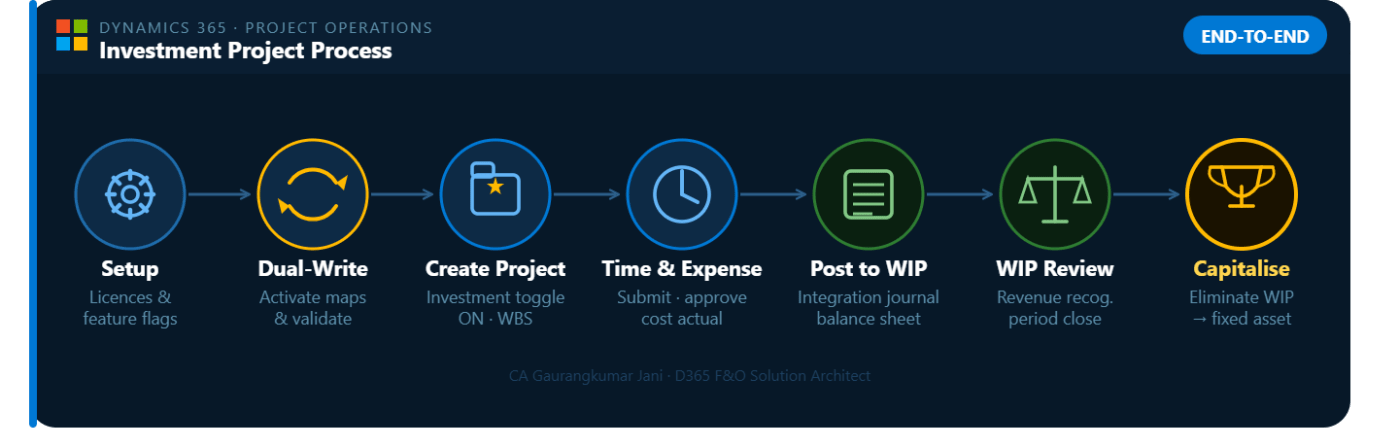
Managing an Investment Project end-to-end across Microsoft Dynamics 365 Project Operations and D365 Finance requires careful setup across two systems connected via dual-write. This guide is based on the latest Microsoft Learn documentation (last updated January 2026) and covers the complete lifecycle — from prerequisites and feature activation through to WIP capitalisation and financial review.
Version requirement: This feature requires Project Operations Dataverse version 4.162.0.X or later and Dynamics 365 Finance version 10.0.47 or later. Do not attempt this configuration on earlier versions.
Step 1: Prerequisites & System Requirements
Before starting any configuration, verify the following licensing, version, and infrastructure requirements are fully met.
Licenses Required
You need active licenses for Dynamics 365 Finance, Dynamics 365 Project Operations (Integrated with ERP deployment — not Lite), and Power Platform (Dataverse), all provisioned on the same tenant.
Minimum Version Requirements
Component
Minimum Required Version
Project Operations Dataverse solution
4.162.0.X or later
Dynamics 365 Finance
10.0.47 or later
Dual-write map: Projects V2 (msdyn_projects)
1.0.0.3
Feature Flags — must be enabled before proceeding
Two feature flags must be explicitly enabled before any investment project functionality is available:
In Dynamics 365 Finance: Navigate to Workspaces → Feature management and enable “Enable investment project for Project Operations integrated with ERP.”
In Dynamics 365 Project Operations: Navigate to Settings → Parameters → Features and enable “Enable investment projects usage for project operations integrated deployments.”
Neither feature is on by default. Both must be active before you create your first investment project.
Base Infrastructure Requirements
D365 Finance environment linked to a Dataverse environment (same region and tenant)
Dual-write Application Orchestration solution packages installed from AppSource
Dual-write in Running state (not paused or erroring)
Legal entity configured with a default currency and fiscal calendar
Chart of accounts with WIP, P&L cost, and fixed asset accounts defined
Workers set up with valid employment records in HCM
Currency exchange rates configured
Required Dual-write Apps — installed in this exact order in Power Platform Admin Center:
Dual-write Application Core Solutions
Dual-write Asset Management Solutions
Dual-write Finance and Extended Solutions
Dual-write Dynamics 365 Human Resources
Dual-write Supply Chain Extended Solution
Dynamics 365 HR Integration to URS
Step 2: Configuration in Project Operations (Dataverse)
Project Operations configuration for investment projects is minimal compared to other project types — there is no billing setup required. The key setup items are Organisational Units, Transaction Categories, and Price Lists.
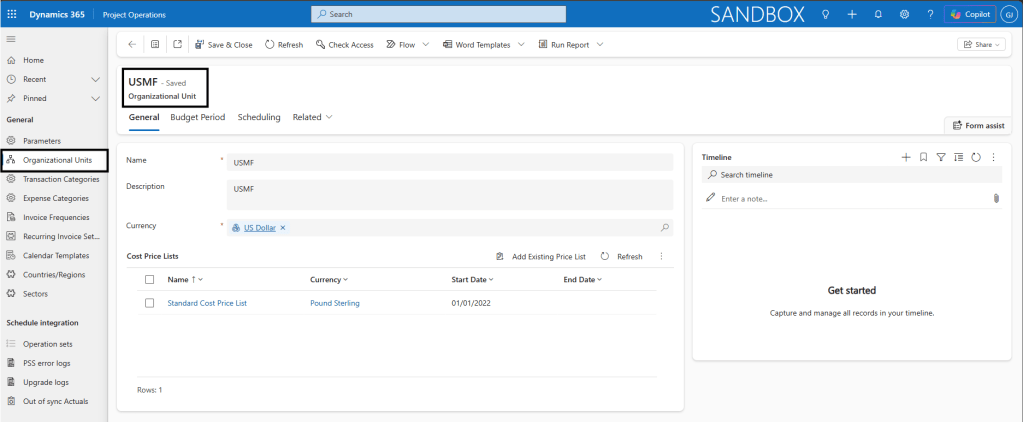
Organisational Units
Navigate to: Settings → Organisational Units
Create or verify the Organisational Unit that will own the investment project (e.g., Finance Division, Capital Projects Team). Each unit must have a cost currency and a cost price list assigned. The owning unit is the key reference that links a project to a legal entity in Finance via dual-write.
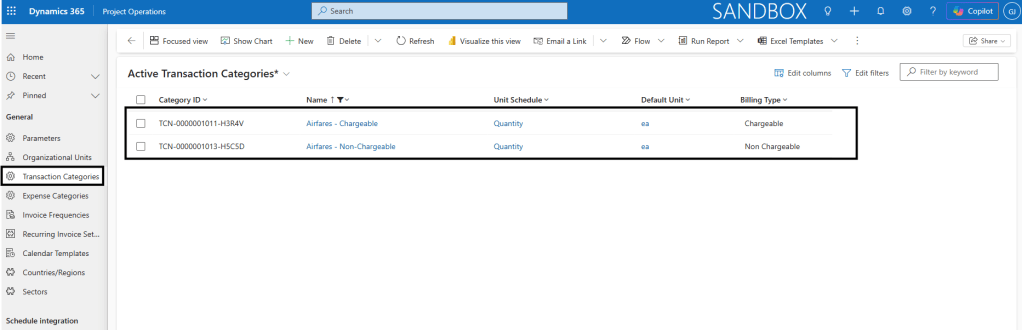
Transaction Categories
Navigate to: Settings → Transaction Categories
Create categories for the types of costs your investment project will incur — for example, Labour, Travel, Equipment, Consultancy. Set the transaction type to Hour or Expense as appropriate. These categories synchronise to D365 Finance as project categories via the Project transaction categories (msdyn_transactioncategories) dual-write map.
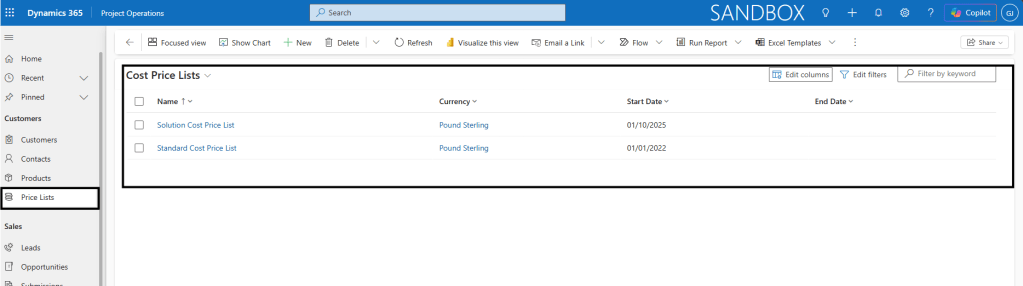
Cost Price Lists
Navigate to: Sales → Price Lists
Set up cost price lists for each Organisational Unit. For investment projects, billing price lists are not needed. The cost price list is required to validate resource cost entries and drive cost actuals. Create one list per currency per organisational unit.
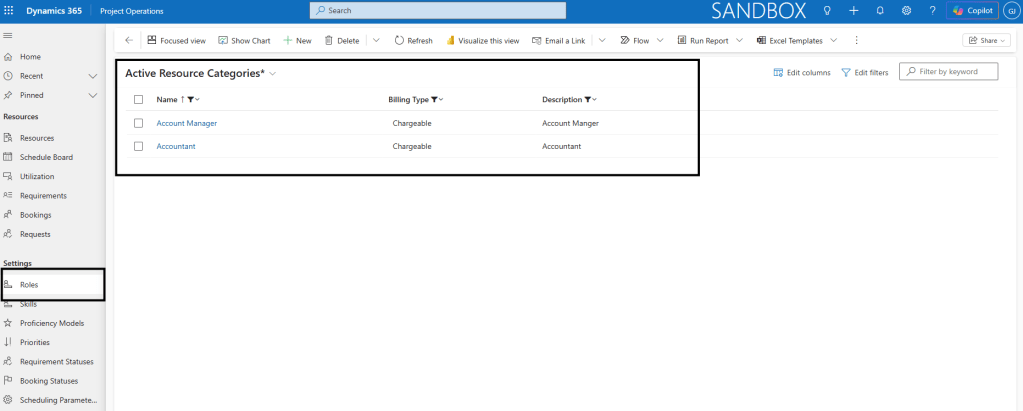
Resource Roles
Navigate to: Settings → Roles
Define roles such as Project Manager, Business Analyst, and Developer. Roles are assigned to team members and drive cost rate lookups from the cost price list. For investment projects, roles can help classify the nature of labour effort being capitalised.
Step 3: Configuration in D365 Finance
The Finance configuration for investment projects no longer uses Project Groups as the primary accounting control. Instead, the correct setup uses Project cost and revenue profiles with the new Investment accounting method introduced specifically for this feature.
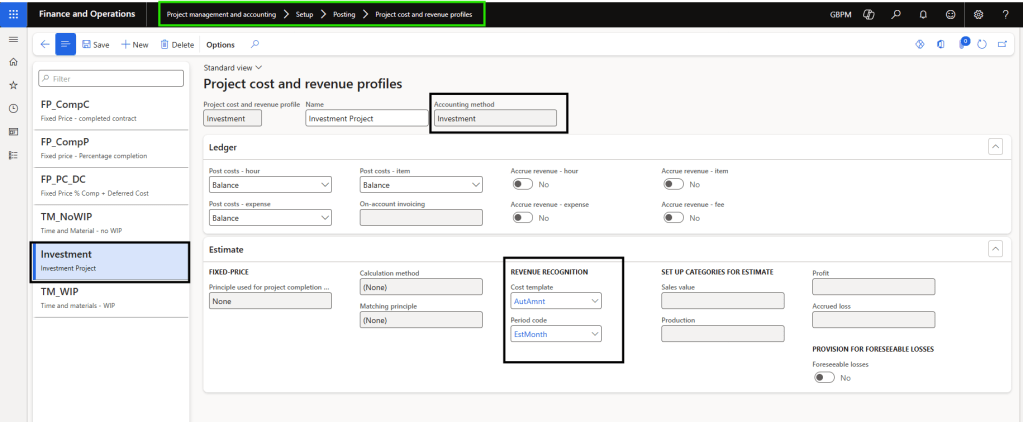
1. Create a Project Cost and Revenue Profile — Investment Method
Navigate to: Dynamics 365 Finance → Project management and accounting → Setup → Posting → Project cost and revenue profile
Select New to create a new profile. Enter a Profile ID and Name. In the Accounting method field, select Investment — this is the new accounting method introduced for this feature and replaces the legacy project group approach for integrated ProjOps scenarios.
Under the profile, configure the ledger setup for each transaction type (Hour, Expense, Item, Fee). For investment projects, costs are accumulated to Work In Progress (WIP) accounts on the balance sheet during the project lifecycle and later transferred to a fixed asset or ledger account during elimination.
Set the Cost template and period code for the revenue recognition process.
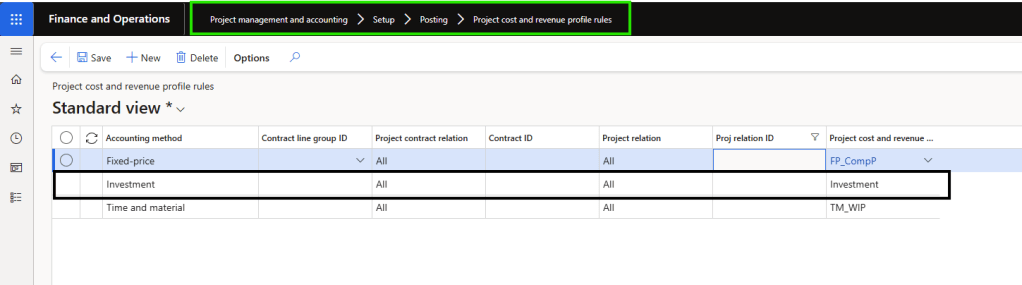
2. Create Project Cost and Revenue Profile Rules
Navigate to: Dynamics 365 Finance → Project management and accounting → Setup → Posting → Project cost and revenue profile rules
Create a new rule. Set the Accounting method to Investment and select the cost and revenue profile you just created. You can apply this rule at the individual project level, a group of projects, or across all projects using the Investment accounting method.
This rule is what connects your investment projects to the correct accounting treatment automatically — without requiring manual assignment on each project.
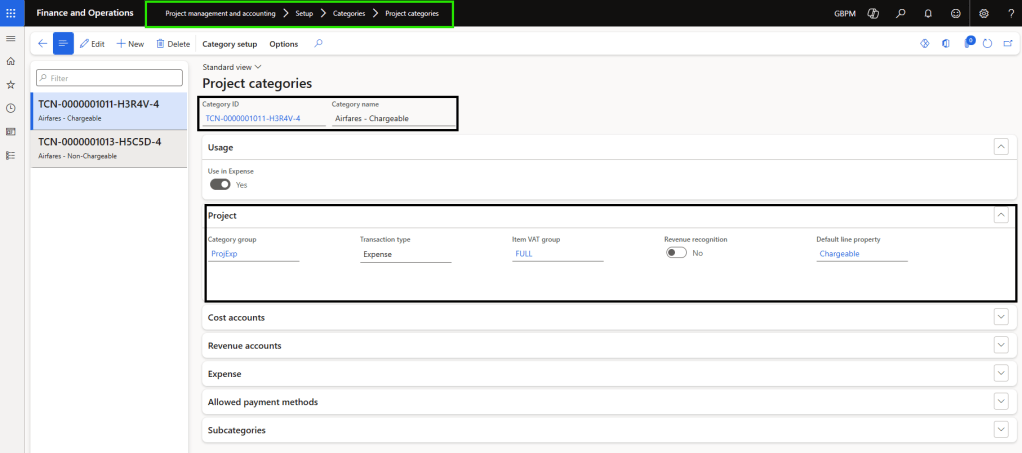
3. Project Transaction Categories
Navigate to: Project management and accounting → Setup → Categories → Project categories
Confirm that the categories you defined in Project Operations are visible here after dual-write sync in shared categories. Once it’s available add relevant categories into Project Categories with proper category groups. Categories must align between both systems for the integration journal to post without errors.
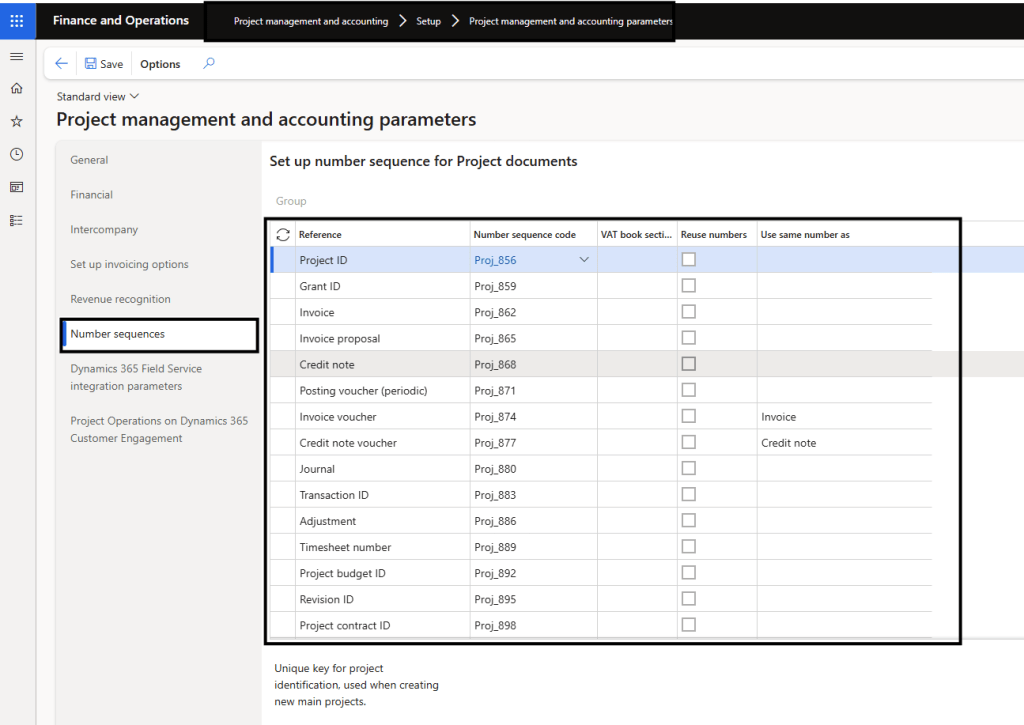
4. Number Sequences
Navigate to: Project management and accounting → Setup → Project management and accounting parameters → Number sequences
Confirm active number sequences exist for Project IDs, Journal IDs, and Expense report IDs (in Expense Management Module). These are required for the system to auto-generate the corresponding records when actuals are transferred from Project Operations.
Step 4: Dual-Write Setup & Map Activation
Dual-write synchronises project master data, transaction categories, and actuals between Project Operations (Dataverse) and D365 Finance. The following maps must be activated before creating an investment project.
Foundation maps — required for all ProjOps integrated scenarios (initial sync required for these):
Table Map
Initial Sync Required
Master for Sync
Legal entities (cdm_companies)
Yes
Finance
CDS Exchange Rates (msdyn_currencyexchangerates)
Yes
Finance
Ledger (msdyn_ledgers)
Yes
Finance
Worker (cdm_workers)
Yes
Finance
Project Operations maps — run in this order after foundation maps:
Table Map
Latest Version
Finance Version Required
Project resource roles for all companies (bookableresourcecategories)
Critical for 10.0.40+: Before activating msdyn_actuals, add a new integration key for Bookable Resource. Go to Finance → Data management → Dual-write → Integration key, and next to Bookable Resource add bookableresourceid [Bookable Resource]. Save before running the actuals map.
Activation steps:
Navigate to Finance → Workspaces → Data management → Dual-write.
Activate foundation maps first with initial sync from Finance as master.
Enable bookableresourcecategories with Dataverse as the initial sync master.
Add the bookableresourceid integration key.
Run all remaining Project Operations maps. Do not run initial sync on these.
Always run the latest version of each map. Check the Version column on the dual-write page and select Table map versions to upgrade if needed.
Validation check: Create a transaction category in Project Operations and confirm it appears in Finance under Project categories within a few minutes. This confirms the pipeline is live.
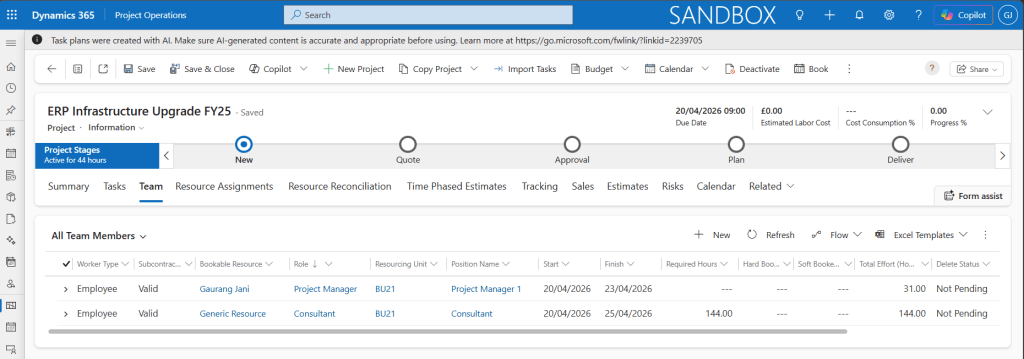
Step 5: Creating the Investment Project in Project Operations
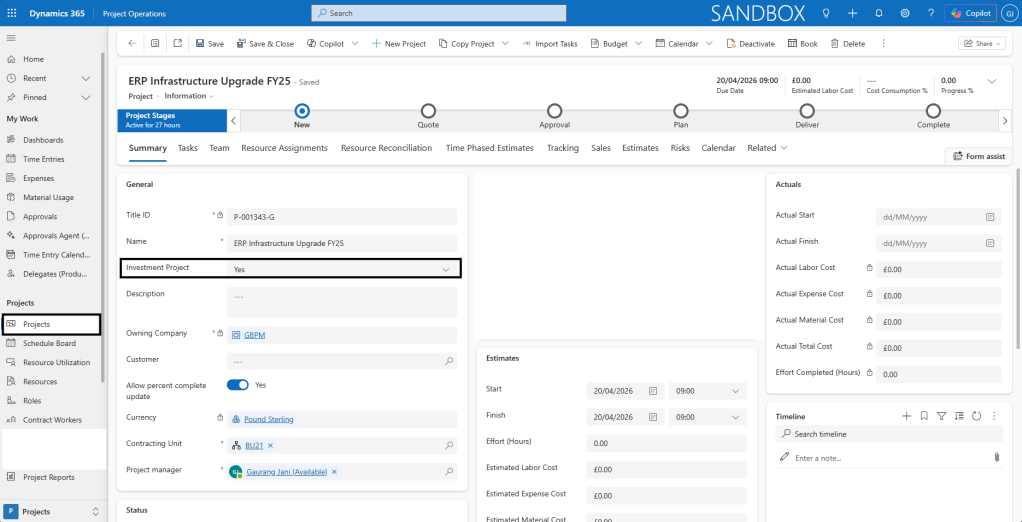
Navigate to: Dynamics 365 Project Operations → Projects → Projects → New Project
The key difference when creating an investment project is a single toggle field — Investment Project — which must be set to Yes.
Field
Value / Guidance
Name
Descriptive project name (e.g., “ERP Infrastructure Upgrade FY25”). Syncs directly to the project name in Finance.
Description
Free text. Syncs to Finance for audit trail purposes.
Owning Company
The legal entity this project belongs to. This is the field that determines which legal entity in Finance the project is created under via dual-write. Must be set correctly.
Investment Project
Set to Yes. This is the field that triggers investment project behaviour — the project type in Finance will be set to Investment automatically.
Project Manager
Assign the bookable resource who manages the project. Default approver for timesheets and expenses.
Start Date / End Date
Define the project timeline. Syncs to Finance project header.
Currency
Defaults from the owning company. Must be a valid transaction currency in Finance.
Important: Once you save the project with Investment Project set to Yes and any transactions have been processed, you cannot change the project type. Ensure this is set correctly from the start.
After saving, the system automatically:
Creates a corresponding Investment project in D365 Finance
Creates a linked Revenue recognition project in Finance with the same Project ID
Allow 2–5 minutes for dual-write to complete this sync before proceeding in Finance.
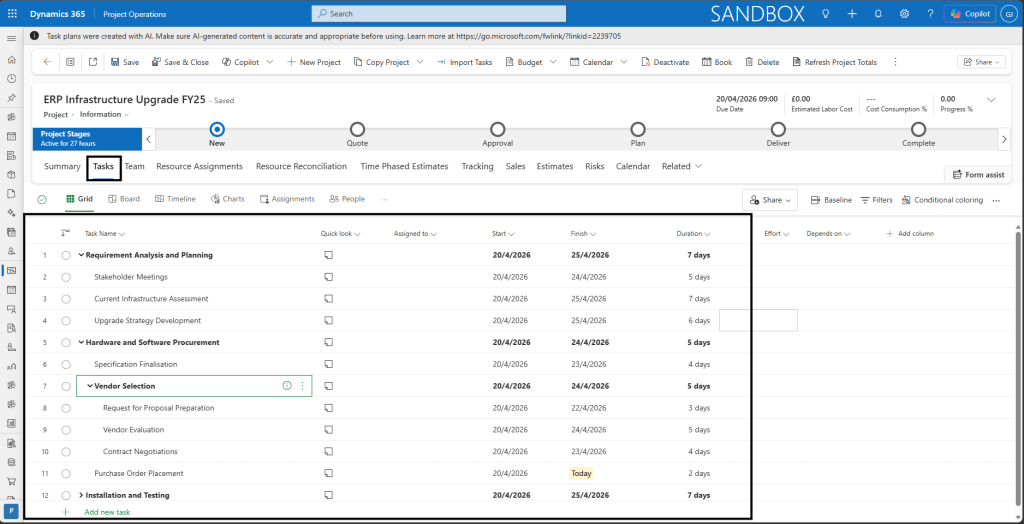
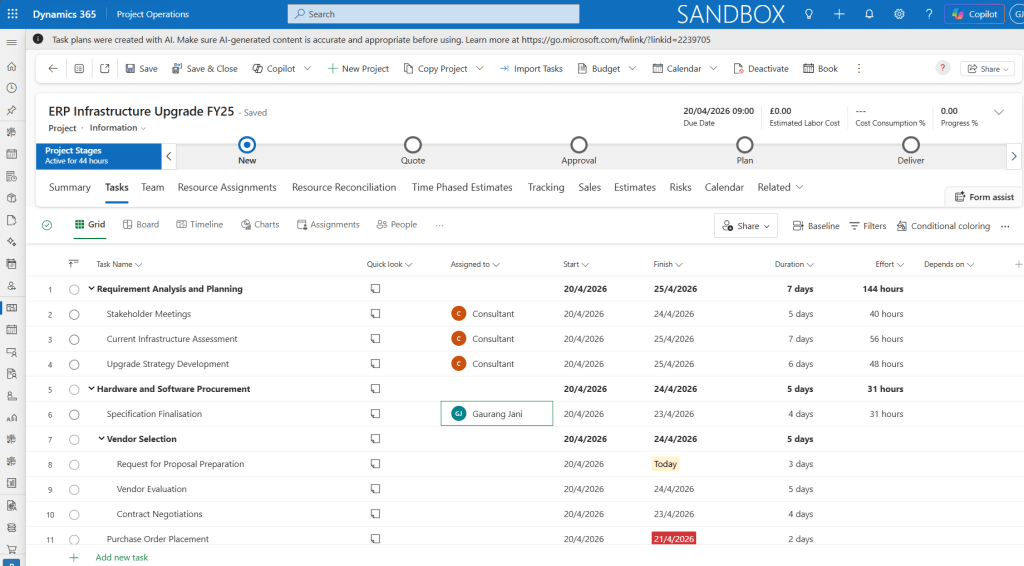
Build the Work Breakdown Structure
Navigate to the Tasks tab. Create your WBS (phases → tasks → subtasks). For investment projects, tasks typically represent capital budget deliverables. The WBS syncs to Finance as project activities and as project forecasts.
Assign Team Members
Go to the Team tab. Add named or generic resources(on task directly), assign their role, and set the date range. Team members are eligible to submit timesheets against this project.
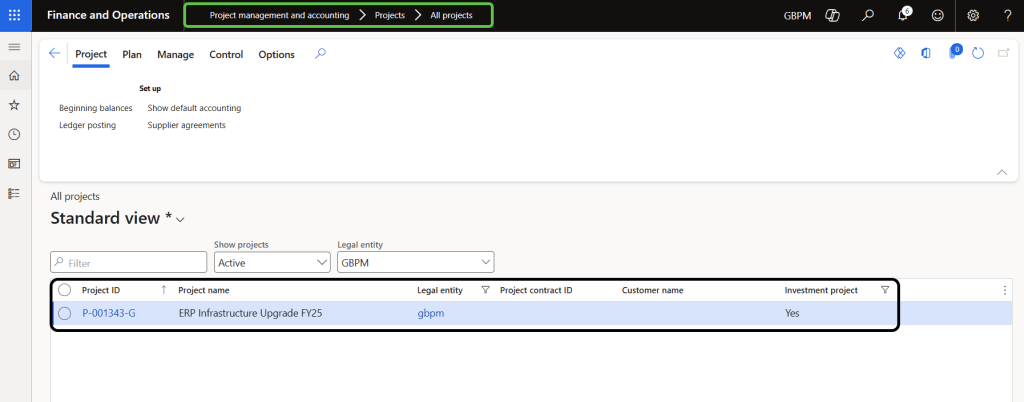
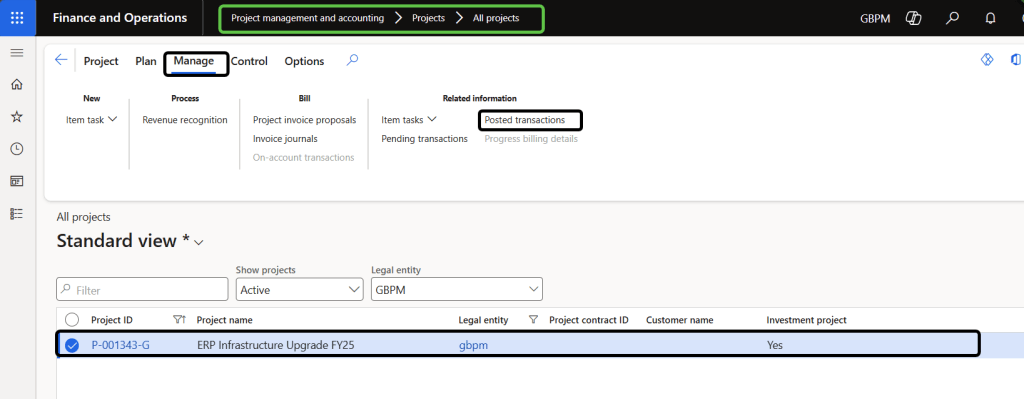
Step 6: Reviewing the Project in D365 Finance
Navigate to: Dynamics 365 Finance → Project management and accounting → Projects → All projects
Search for the project by its ID or name.
Verify the Investment project record
Confirm the project is marked as type Investment, the name and dates match Project Operations, and the Owning company is correct. The project stage should show as In Process (This is default in Dynamics 365 FSCM, you can check by adding column in list page).
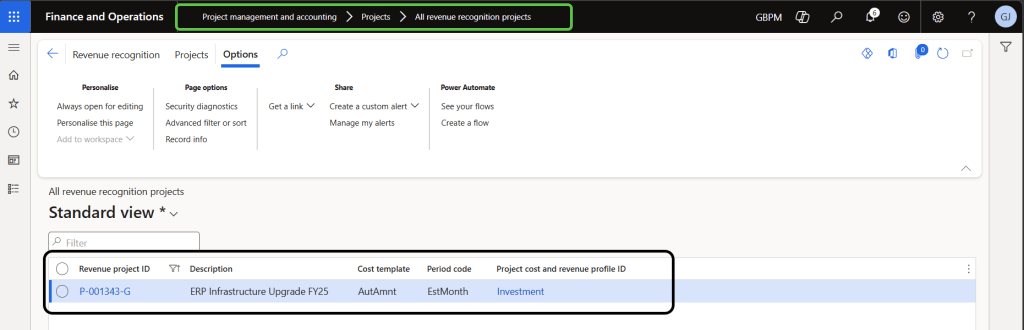
Verify the Revenue recognition project
This is a new and important element introduced with this feature. Navigate to:
Project management and accounting → Projects → All revenue recognition projects
A revenue recognition project should have been automatically created with the same Project ID. Select it and confirm it is associated with your Investment project. This revenue recognition project is the mechanism through which WIP costs are later transferred to a ledger account or fixed asset during project completion.
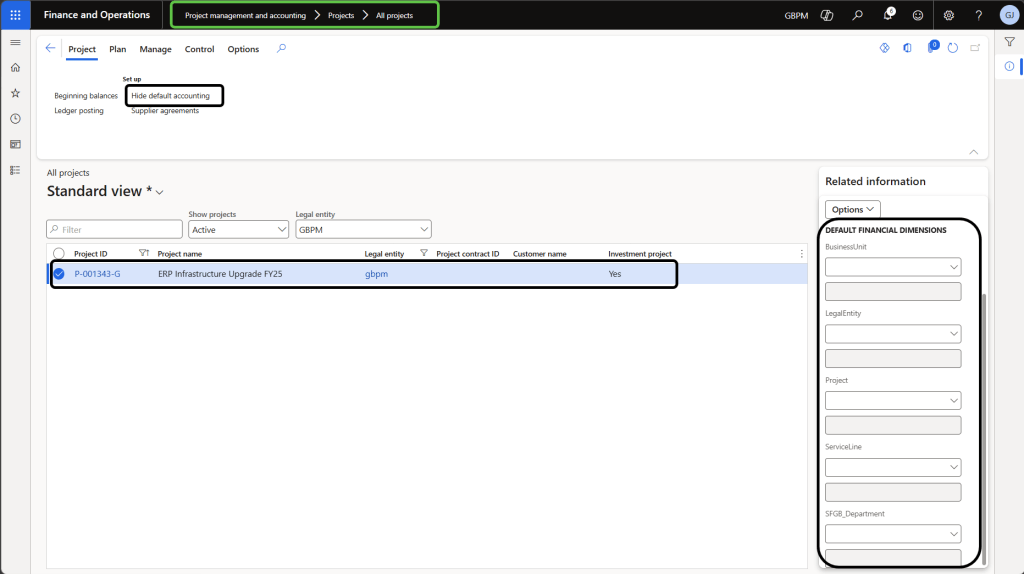
Update accounting attributes
Navigate to: All projects → Set up → Show default accounting
Assign the correct financial dimensions (Department, Cost Centre, Business Unit) and verify the cost and revenue profile rule has correctly resolved to the Investment profile you configured in Step 3. These attributes default onto all transactions.
Step 7: Posting Expenses & Timesheets in Project Operations
Timesheets and expenses are submitted and approved in Project Operations. Upon approval, the system generates cost actuals in Dataverse which are then transferred to Finance.
Timesheet Process
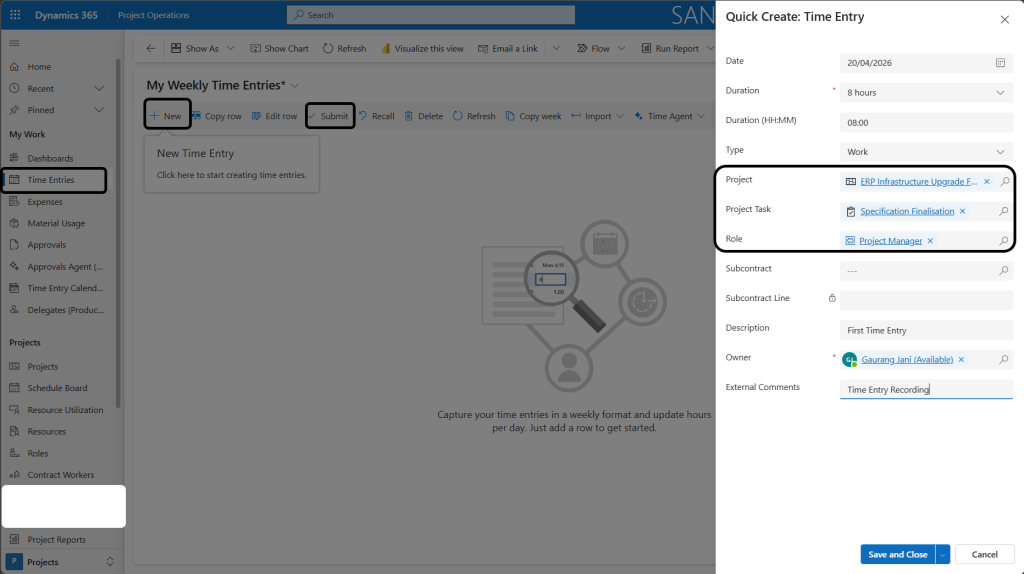
Step 1 — Submit time entry
Navigate to: Project Operations → Time → New Time Entry.
Select the project, task, role, date, and hours.
Submit for approval.
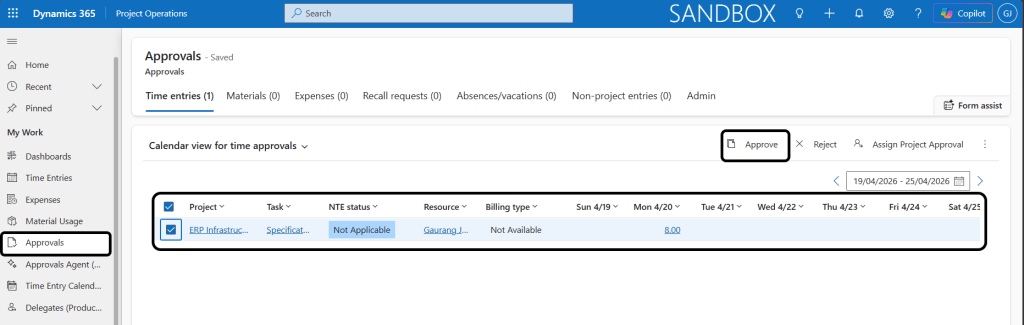
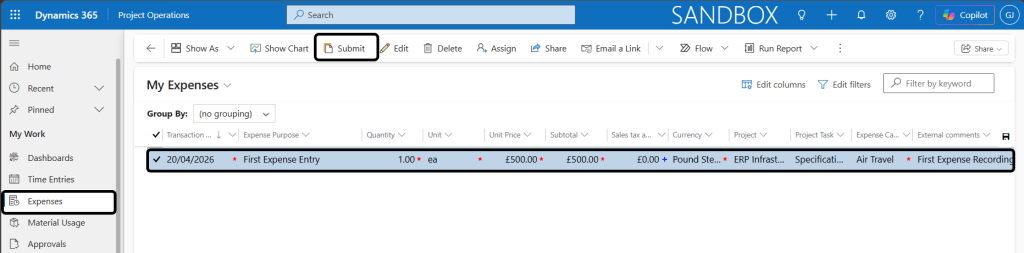
Step 2 — Approve
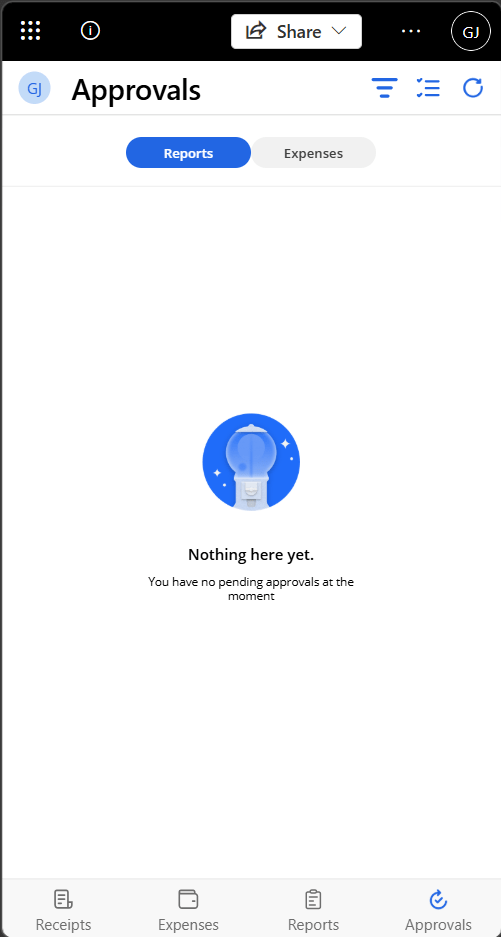
The project manager approves in: Project Operations → Approvals.
On approval, the system creates a confirmed Cost Actual record in Dataverse.
Step 3 — Transfer to Finance The approved actual is picked up by the Project Operations integration actuals (msdyn_actuals) dual-write map and written to the integration journal staging table in Finance. The actual status updates to Integration Pending.
Expense Process
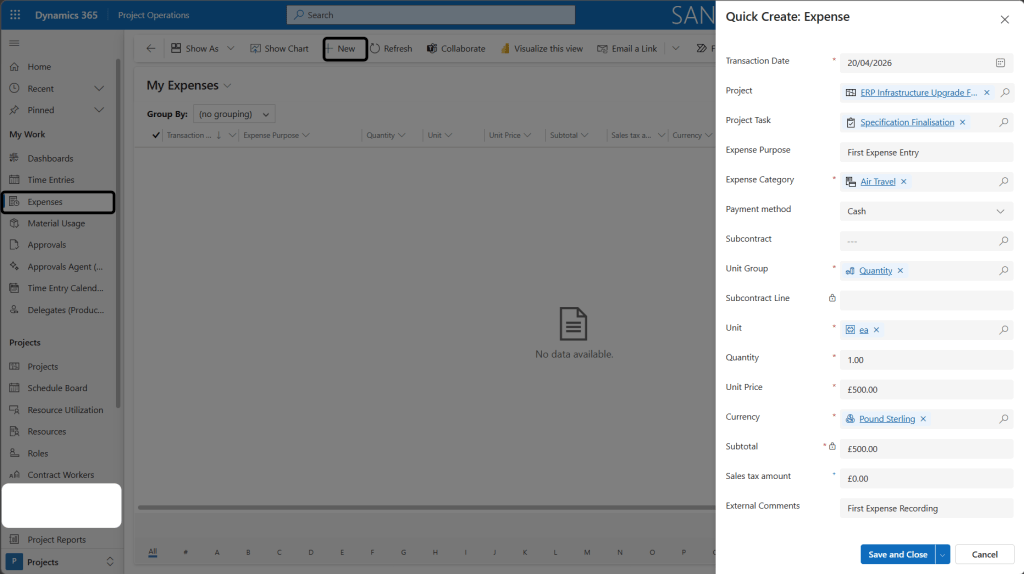
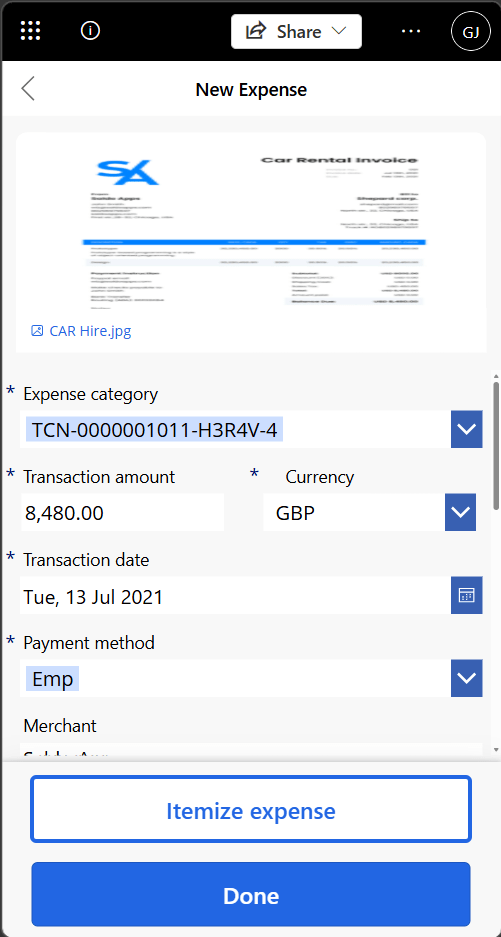
Step 1 — Create expense entry
Navigate to: Project Operations → Expenses → New Expense. Select the project, category (e.g., Travel), date, amount, and currency. This is just to record expense (not as employee reimbursable expense)
If it’s reimbursable Expense use Mobile device Expense Application
Attach receipts as required by your organisation’s policy.
Once Expense is ready in mobile device, add into Expense Report (One report can have more than one Expenses)
Step 2 — Submit and approve
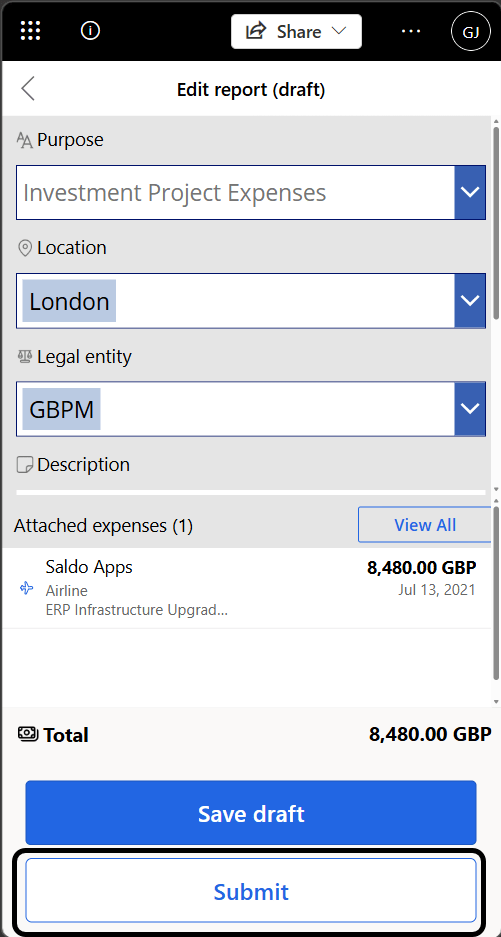
Submit for approval. The approver reviews in the Approvals queue. On approval, a cost actual is created in Dataverse and queued for sync to Finance. if it’s created and submitted in Expense App it will on appear in Project until it’s posted in Dynamics 365 Finance.
Approval:
If submitted from Mobile application it be approved from Dynamics 365 finance as normal workflow or in mobile app from below screen:
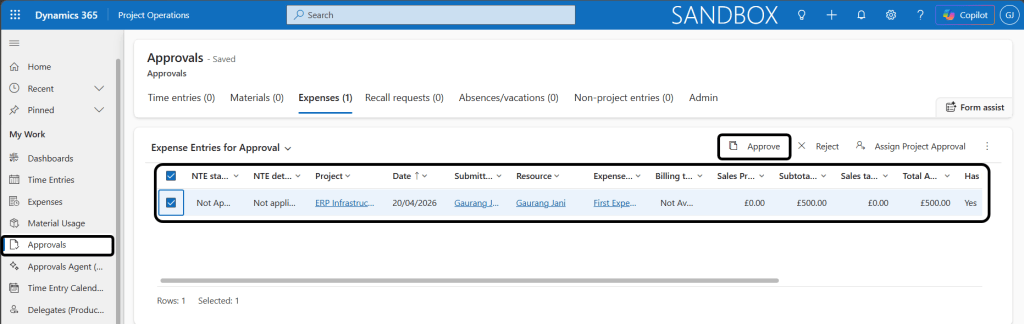
Note: Actuals in Dataverse are immutable once confirmed. If a correction is needed, use the Recall action, which generates a reversal actual. Both the original and the reversal will transfer to Finance, producing a net-zero entry in the integration journal.
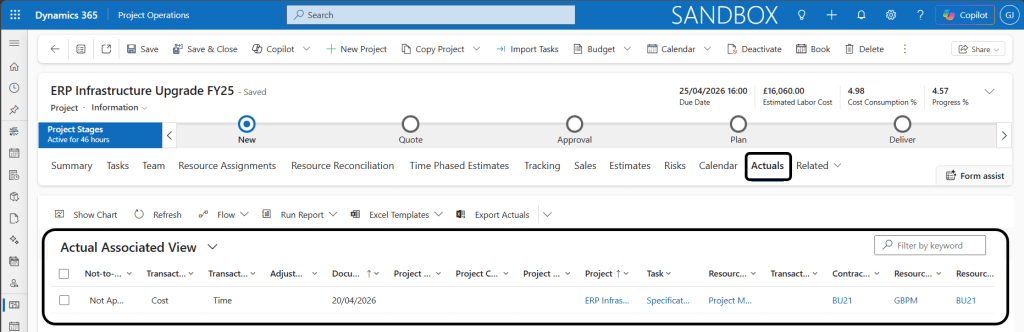
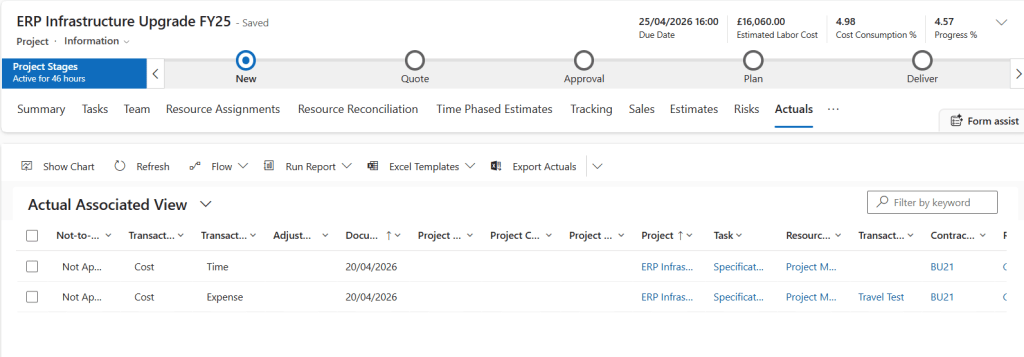
Actuals:
Once it’s approved, Actual record will be created against the Project:
Step 8: Integration Journal Posting in D365 Finance
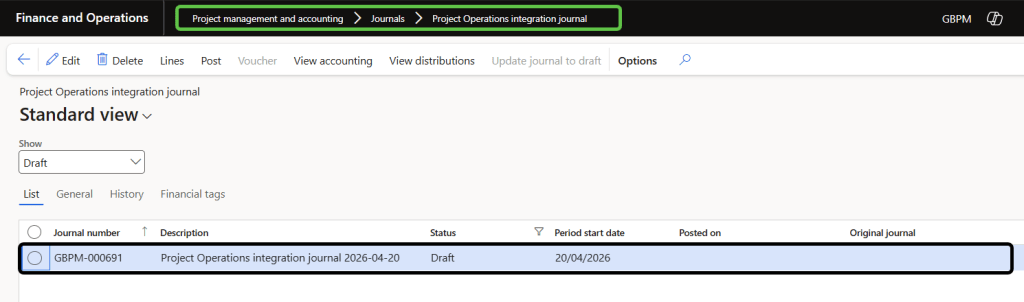
Approved actuals land in the Project Operations Integration Journal staging area in Finance. You generate and post this journal to record costs in the general ledger.
Step 1 — Open the integration journal
Navigate to: Project management and accounting → Journals → Project Operations integration journal. Use the batch process: Periodic tasks → Import from staging table. This moves staged lines into a journal header ready for review. This shows all actuals from Project Operations staged but not yet posted to the GL in draft stage.
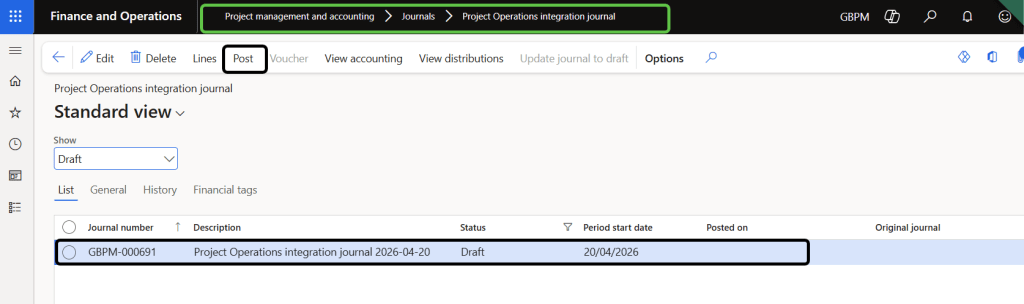
Step 2 — Validate / View Accounting: Click View Accounting to check for errors — missing dimensions or Missing Accounts. Resolve all errors before posting.
Step 3 — Post Click Post (Or schedule batch job to auto post integration journal from periodic tasks). For investment projects, this creates vouchers that debit the WIP Cost Value account on the balance sheet (not the P&L), with the offset credit determined by the cost and revenue profile ledger setup.
Step 4 — Confirm actuals in Dynamics 365 Finance Once posted, the actuals in the Integration Journal will be recorded in Dynamics 365 Finance. You can then validate these actuals in Posted Transactions against the Project in Dynamics 365 Finance, confirming the end-to-end cycle is complete for those transactions.
Best practice: Post integration journals on a regular cadence — daily or at minimum weekly. Leaving actuals in staging across a period close creates reconciliation gaps and WIP balance mismatches at month-end.
Step 9: Reviewing Financials in D365 Finance
Once integration journals are posted, the full suite of project financial reports reflects the investment project costs.
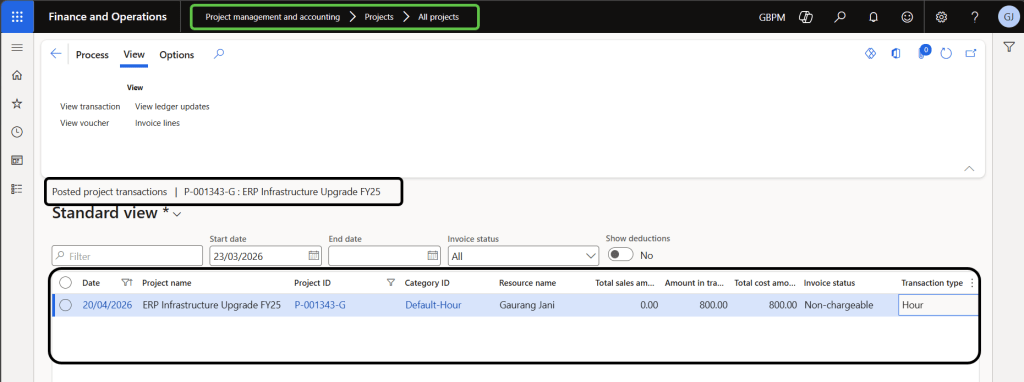
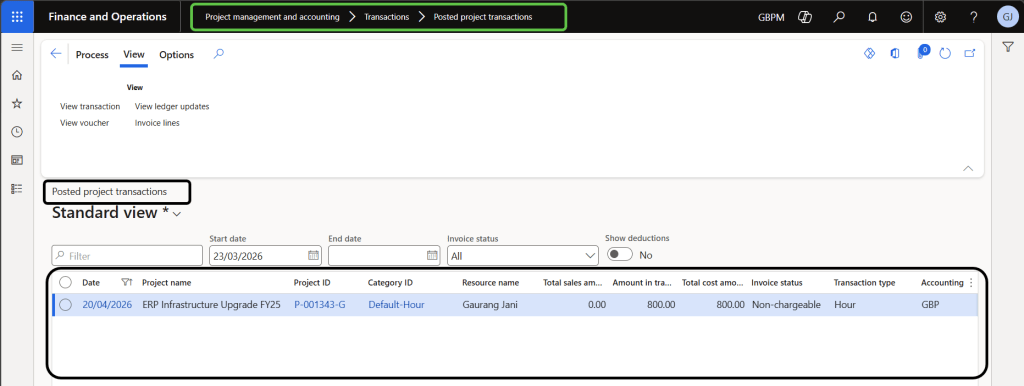
Posted Project Transactions
Navigate to: Project management → Inquiries → Project transactions
Drill into every posted cost line — date, category, amount, worker, and voucher reference — for a complete audit trail.
Voucher Transactions
From any project transaction, click Voucher to see the debit/credit accounting entries. For investment projects, you should see a debit to the WIP Cost Value balance sheet account, confirming costs are being capitalised and not expensed.
Project Statement
Navigate to: Project management → Reports → Project statement
Run a cost statement showing budget vs. actual costs by category and period — essential for project owner sign-off and governance reviews.
Revenue Recognition & WIP Transfer
Navigate to: Project management and accounting → Projects → All revenue recognition projects
Select the Revenue recognition project linked to your investment project. This is where the periodic WIP assessment and eventual capitalisation take place.
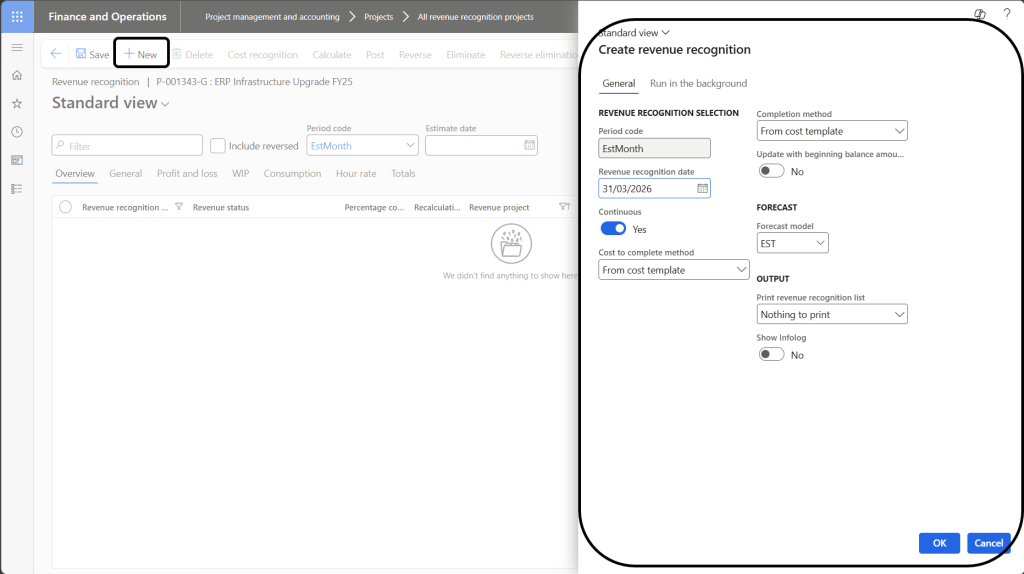
To run revenue recognition:
Select the revenue recognition project and click Revenue recognition → New to create a period snapshot.
Validate the percentage of completion.
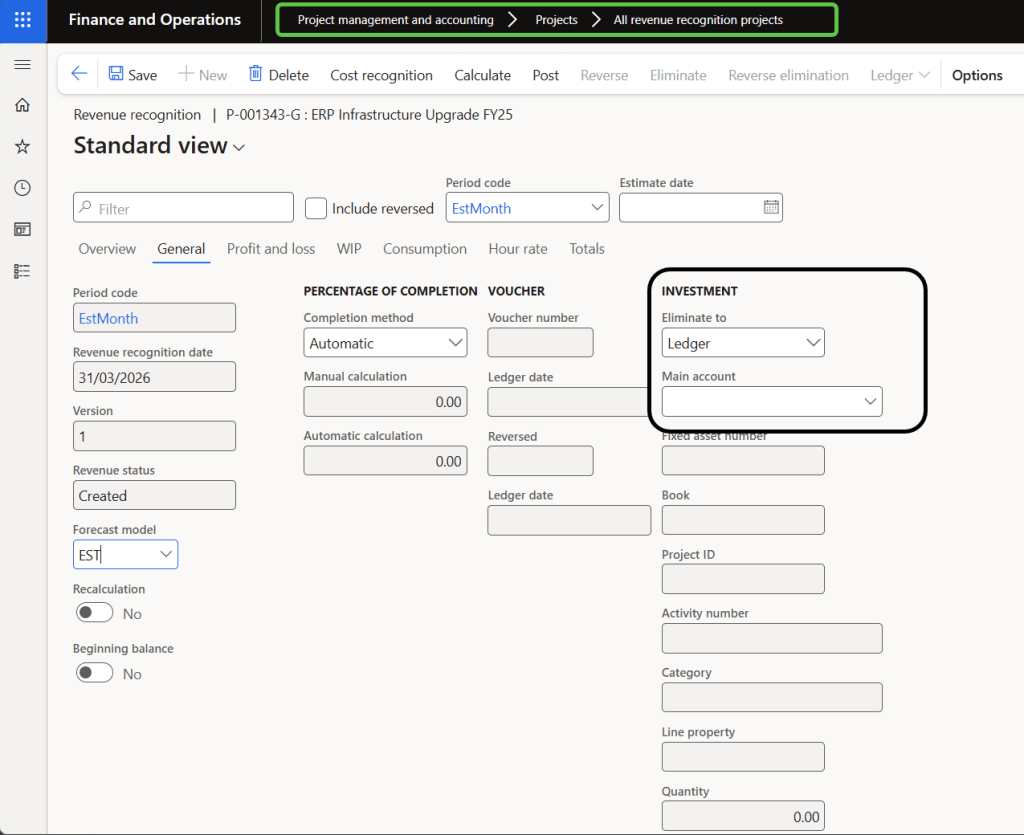
On the General tab, select Eliminate to as either Ledger or Fixed asset.
Click Post to generate the financial entries that reclassify costs from P&L to WIP (balance sheet).
Project Completion & Elimination (Capitalisation)
When the investment project is complete and all costs are posted:
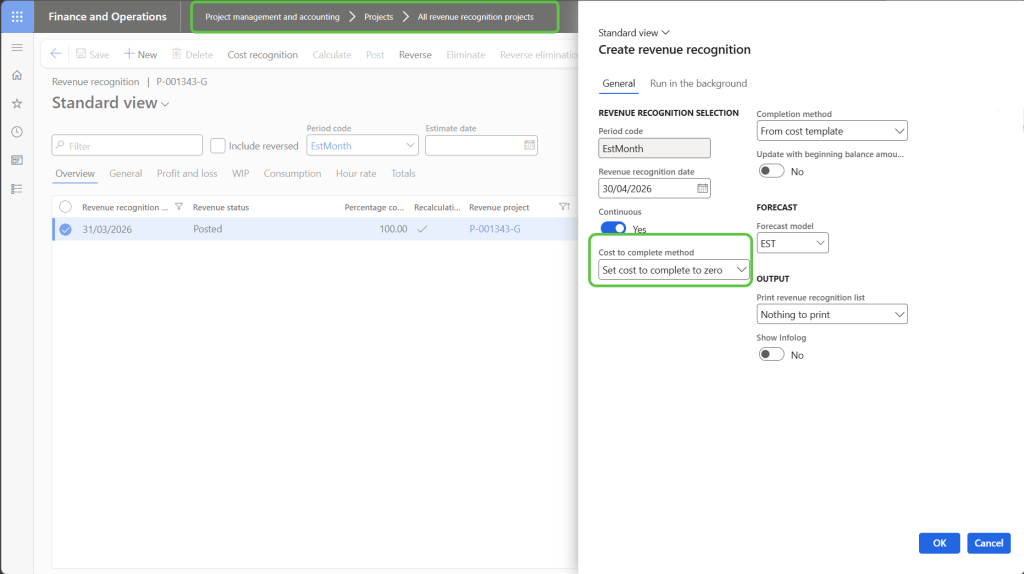
Navigate to All revenue recognition projects. Select the revenue recognition project.
Click Revenue recognition and set Cost to complete method to “Set cost to complete to zero.”
Validate the WIP, profit and loss details, and project snapshot.
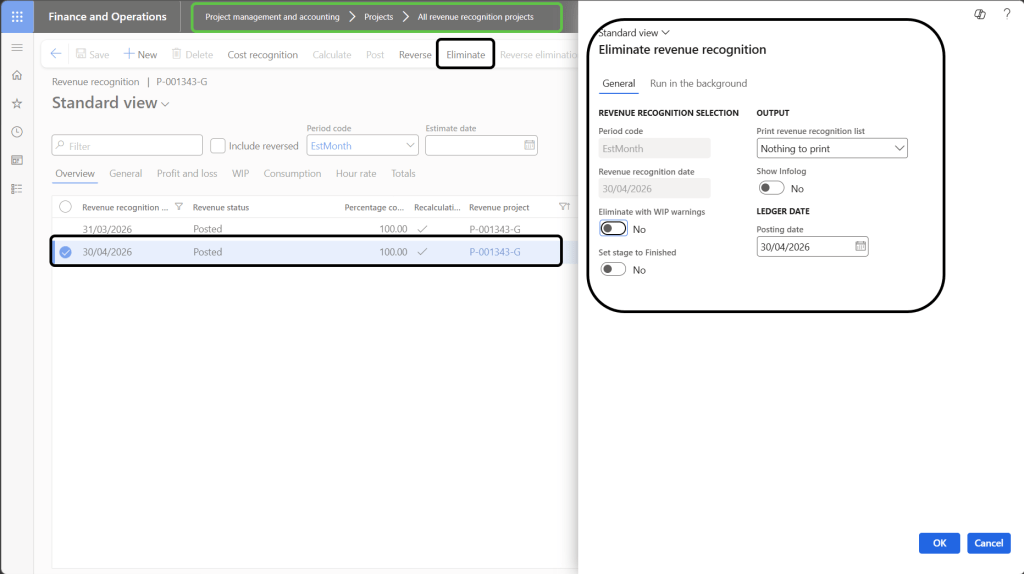
Click Eliminate. This transfers all accumulated WIP costs from the Balance Sheet (WIP accounts) to the Ledger account or Fixed asset you designated during the first revenue recognition run — completing the capitalisation cycle.
Period-End Reconciliation
At month-end, reconcile the WIP GL account balance against the total WIP shown across all investment projects in the WIP inquiry. Any staged-but-unposted integration journal lines must be posted before the period is closed to ensure accurate financial statements.
CLOSING NOTE
When actuals in Project Operations show Integration Complete, vouchers exist in the GL debiting WIP accounts, and the revenue recognition project reflects the accumulated costs — your Investment Project cycle is fully operational across both systems.
The key things that differ from legacy D365 Finance-only investment projects: the project is always created first in Project Operations (not Finance), the accounting treatment is driven by the new Investment accounting method in the cost and revenue profile (not project groups), and capitalisation is executed through the auto-created Revenue recognition project (not a manual capitalise costs periodic task).


Leave a comment